Showing posts with label with. Show all posts
Showing posts with label with. Show all posts
Monday, January 27, 2014
Petersburg MI working with gel stains
For the past several days, I have begun to stain the cherry panels and have finished prepping the solid cherry trim. For this phase, I had to take one whole day to de-dust the shop. When finishing, you need a clean environment.
I thought this would be a great opportunity to talk about gel stains. Gel stains are a different animal than water or oil based stains, and need to be treated as such. Gel stains came out a few years back when people wanted a "wipe on and its done" type of stain. What came out on the market because of that was gel stains, but theyre certainly not a one-coat-and-your-done type of stain. As a matter of fact, they are sometimes more difficult to work with than oils. In addition, cherry tends to blotch no matter what type of stain is used, so this is certainly a high maintenance stain job!
I begin by sanding down to no more than 100 grit. Cherry needs no more than that. Then I remove as much sanding dust as possible. I wipe the piece with denatured alchol to remove fine particles, and also to show any flaws. I put on the first coat using a swirl motion to get the gel down into the pores of the wood. Then I remove the excess going with the grain of the wood - like this:

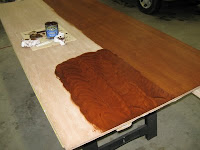

Im able to do 1 sheet in an hour and 15 minutes, and have room in the shop to do 4 sheets at a time. I let the first coat dry completely overnight. Because there are some spots that are uneven and splotchy, I need to sand down the entire sheet(s) to even things out.
In the picture below, you can see 2 sheets - one sheet is sanded after the first coat, and the other is with a second coat of gel stain applied.

Below is a closer picture of the difference between a sanded side and a side with the second coat. Obviously, the more you can even out your coats, the better finish you will get.
There are 8 sheets that need a minimum of 8 coats each. Thats 64 coats, times 1.25 hours per coat = alot of time invested in finishing! This does not include the solid cherry trims that need 8-10 coats also! Remember though - dont rush!

Read More..
I thought this would be a great opportunity to talk about gel stains. Gel stains are a different animal than water or oil based stains, and need to be treated as such. Gel stains came out a few years back when people wanted a "wipe on and its done" type of stain. What came out on the market because of that was gel stains, but theyre certainly not a one-coat-and-your-done type of stain. As a matter of fact, they are sometimes more difficult to work with than oils. In addition, cherry tends to blotch no matter what type of stain is used, so this is certainly a high maintenance stain job!
I begin by sanding down to no more than 100 grit. Cherry needs no more than that. Then I remove as much sanding dust as possible. I wipe the piece with denatured alchol to remove fine particles, and also to show any flaws. I put on the first coat using a swirl motion to get the gel down into the pores of the wood. Then I remove the excess going with the grain of the wood - like this:
Im able to do 1 sheet in an hour and 15 minutes, and have room in the shop to do 4 sheets at a time. I let the first coat dry completely overnight. Because there are some spots that are uneven and splotchy, I need to sand down the entire sheet(s) to even things out.
In the picture below, you can see 2 sheets - one sheet is sanded after the first coat, and the other is with a second coat of gel stain applied.
Below is a closer picture of the difference between a sanded side and a side with the second coat. Obviously, the more you can even out your coats, the better finish you will get.
There are 8 sheets that need a minimum of 8 coats each. Thats 64 coats, times 1.25 hours per coat = alot of time invested in finishing! This does not include the solid cherry trims that need 8-10 coats also! Remember though - dont rush!
Friday, January 24, 2014
Scribe Fit Trim With Hatchet Froe and Drawknife
Next on the house project list was finishing up around the woodstove platform. When I lay the flooring, I left a gap around the platform for two reasons. First, a small gap was needed around all edges of the flooring to allow for expansion. Second, I knew I was going to put some kind of cap or trim around the stones, so I didnt need to be precise with the flooring itself - which explains why the gap is so much larger than needed for the expansion factor.

I decided to make the trim out of the same bamboo as the floor - but narrower. Now the bamboo is hard stuff, plus it is coated with an anti-scratch layer of some sort (aluminum oxide?), and when I ripped this by hand in the past, it really wore out the saw, and me too. This time I decided to work a little smarter and use a different set of tools.
First, I picked my width. The flooring has two shallow grooves on the back, and I used one of these as a handy reference for splitting out, or riving, my trim stock.
I like to start this job with a hatchet rather than going directly to the froe. Hatchets are awesome, and underutilized tools in the shop, but they are scary and need to be respected. Always chop well below the hand that is holding the work. When you are starting at the top, you have to get tricky. Never hold the top of the piece with one hand and chop right next to it. This is a good way to lose fingers. Instead, what I do is hold the work in my left hand and carefully place the hatchet edge where I want to start the split. Then I lift the whole thing off the ground as one unit. As I drop it back to the ground my left hand pulls away, the bottom of the board hits the ground, and the hatchet, which has never separated from the board, drives a short way into the end of the board.
Heres pictures to help illustrate the first two steps - minus my left hand, which is holding the camera. Beginning position:

After the first lift and drop:

Now that the hatchet is into the board, I can repeat the lift and drop with more force, driving the head in deeper:

Time to switch to the froe:

One or two good levers on the froe handle and the waste pops off and the trim is ready for the jack plane to clean it up:

With the stock ready, I could begin the much more precise job of scribing the trim to match the uneven surface of the rocks. Keeping the trim parallel to the flooring, I moved it towards the rocks until it made contact. To keep it in place while I worked, I taped it down with blue painters tape. Then, using the dividers - point on rocks and pencil on trim, I carefully scribed the contour of the rocks onto the top of the trim. Heres a shot of the setup - the shim is holding a loose rock in place until the trim takes over that job.

Then out to the shop for a little scrub plane and a lot of drawknife action.
Using the scrub plane (after the first piece, I switched to doing the whole job with the drawknife - just plain faster...or is it plane faster...) I created a back bevel on the trim. The pencil lines help me keep track of how close I am getting, and was a step I didnt need after switching to using the drawknife for this part.

Next, with the trim held in the bench vise (for edge work on flat stock, I tend to use the bench vise - most other times I use the shavehorse) and using the drawknife bevel down, I cut down to the scribed line. I do this on an angle, creating another bevel on the face side of the board.

Heres another shot with the piece reversed (front side is showing):

Then I switch to the back side again, and cut the final relief bevel behind the cut edge. This does not need to be very dramatic, a shallow angle works most of the time.

If I did it right, when viewed from dead on, I should see only the scribed edge. In this shot, you can see I have a little more relief work to do over on the far right.

The drawknife is a powerful tool. It is fast, accurate, and if you are using your whole body, it has tons of control. I have done similar jobs using a coping saw, and I will never do that again! This method was so much easier and cleaner too.
One final note about working with drawknives - be careful! They have a lot of exposed blade just inches from your hands. My rule is "Keep both hands on the handles, or keep your eyes on the blade!" The only time I ever cut myself with a drawknife, I had taken my hand off the handle, and then went to put it back without looking at what I was doing. My hand missed the handle and found the blade - ouch! Oh well, now that finger tells me when the weather is going to change...
Here is a shot of what the drawknife is capable of doing:

And that piece in its final home:

Now that the trim is done, I can start working on the fence that will rest on it and will hopefully keep Teague away from the rocks and hot woodstove. Hopefully. He is already starting to show signs of being a climber!
Subscribe to:
Posts (Atom)