Thursday, March 6, 2014
TV stand the front legs
I havent had time to examine my fridge and figure out where and how I can add some coolant. Thanks for everyone who had suggestions on how I can cool my beer. Actually, one of the best ideas is just to get a box and an ice brick. I think Ill keep scouring Craigslist for free mini-fridges, like they have in hotel rooms. Then I gotta my old one up to the dump and pay a $40 disposal fee. At least thats what they charged about five years ago; I suspect its more now.
But on to more important matters. I spent the weekend working on the two front legs of the TV stand. (For reasons I cant really identify, I am going to stop calling it an entertainment center.) Its a good thing I dont do this for a living because I would never reach deadlines. I cant believe all I accomplished over the course of two days was two legs.
Well here they are:

They sort of look a combination of the Chrysler Building and Golden Gate Bridge. Ive always been intrigued by Art Deco style, even though Im not completely sure how to define it. I used MDF for these because I plan on painting them. Its just a one inch core surrounded by layers of 1/4" MDF.
 Im a little stumped on how to securely attach them to the lower shelf. They are pretty heavy and could easily become weak links and break off when the unit is moved. Im thinking about joining it all together with a couple of thick dowels. The trick will be getting it all lined up.
I also went to Target and priced some TV wall mount brackets. Holy cow, the least expensive unit was about sixty bucks. I dont see any reason why I cant just install some metal strips behind the upright. Id rather spend a few bucks than sixty. Well see.
And my final concern to ponder this week is if the entire stand will be stable on just three legs. I think it will as I tend to overbuild these things.
Read More..
But on to more important matters. I spent the weekend working on the two front legs of the TV stand. (For reasons I cant really identify, I am going to stop calling it an entertainment center.) Its a good thing I dont do this for a living because I would never reach deadlines. I cant believe all I accomplished over the course of two days was two legs.
Well here they are:
They sort of look a combination of the Chrysler Building and Golden Gate Bridge. Ive always been intrigued by Art Deco style, even though Im not completely sure how to define it. I used MDF for these because I plan on painting them. Its just a one inch core surrounded by layers of 1/4" MDF.
I also went to Target and priced some TV wall mount brackets. Holy cow, the least expensive unit was about sixty bucks. I dont see any reason why I cant just install some metal strips behind the upright. Id rather spend a few bucks than sixty. Well see.
And my final concern to ponder this week is if the entire stand will be stable on just three legs. I think it will as I tend to overbuild these things.

Wednesday, March 5, 2014
Build a router lift
When I set out to make my router table, I decided early on that I wanted to include a router lift. It makes it easy to raise and lower the router without having to reach underneath, and bits can be changed from the top of the table.
 Lots of lifts
I looked at a lot of different lifts. If you are ambitious, I highly recommend Matthaias Wandels incredible tilting lift over at Woodgears.ca. Put simply, Mathhias is a genius. He puts a lot of work into his plans are they incredibly detailed and accurate. For $14, its worth it.
On the other end of the home-made spectrum, Weekend Workshop on You Tube made an intriguing router lift using a car jack!
 I decided to go in between these two and built a lift that was featured in issue 121 of Shop Notes magazine. It is a pretty simple concept, but was definitely a challenge to my skills. Thats the kind of project I like. It works really well.
Shop Notes
I wanted to provide a link to the plan.
I contacted Shop Notes and strangely, they have no way to buy the plan online or even to buy the issue it was in! Uh, it was this year...January, 2012. Really old skool.
They have a lot of great projects and it seems to me like they are really missing the boat on this one. Even the Shop Notes web site is pretty lame. Cmon Shop Notes! Heres an opportunity to make some extra money.
So if you dont get Shop Notes and are interested in the plan, poke around a little. There are people selling back issues.
Read More..
I looked at a lot of different lifts. If you are ambitious, I highly recommend Matthaias Wandels incredible tilting lift over at Woodgears.ca. Put simply, Mathhias is a genius. He puts a lot of work into his plans are they incredibly detailed and accurate. For $14, its worth it.
On the other end of the home-made spectrum, Weekend Workshop on You Tube made an intriguing router lift using a car jack!
Shop Notes
I wanted to provide a link to the plan.
I contacted Shop Notes and strangely, they have no way to buy the plan online or even to buy the issue it was in! Uh, it was this year...January, 2012. Really old skool.
They have a lot of great projects and it seems to me like they are really missing the boat on this one. Even the Shop Notes web site is pretty lame. Cmon Shop Notes! Heres an opportunity to make some extra money.
So if you dont get Shop Notes and are interested in the plan, poke around a little. There are people selling back issues.
Is Using a Shed Kit a Good Idea As One Makes Plans for Shed Building
By [http://ezinearticles.com/?expert=Don_Koenig]Don Koenig
We live in an increasingly complex world and often it seems that it is to our advantage to make things as simple as possible. So I begin with this basic question: When making plans for shed building in your backyard, is it best to use a pre-fabricated shed building or building the shed from scratch? Like everything else in life, the truthful answer is that it depends on your goals, confidence and experience.
Making Plans
I assume that because you are reading this you are planning to build a shed but you are still in the process of making your decision. Look, if you are an experienced carpenter or handyman you would have already made that decision, putting all of your experience to use. As a novice or a home hobbyist woodworker, you must decide several things before you begin your project. Building from a set of blueprints, providing they are the right kind of plans, offers far more flexibility in both design and space possibilities but is only slightly more complex to assemble. Of course, if you have the wrong plans then the project is doomed to being a full-blown disaster.
When I talk about the right plans I mean getting them from a source that offers a full line of designs and sizes to meet any space requirement. Those plans should also have a detailed, step-by-step set of instructions that assume that you know absolutely nothing about how to approach the task. Finally, your plans must have a full material list, down to the last nail and screw so there is no guesswork in purchasing materials needed. If you use a source like that then building from scratch is the way to go.
Advantages and Disadvantages
Of course, pre-fabricated storage sheds offer some options and have many potential advantages:
- There is a wide choice of materials available...
- Many pre-fab sheds are fully insulated and that provides an advantage if you plan on heating the shed...
- Interlocking pre-fab shed designs offer you the advantage of align and snap construction making the job more like solving a jig-saw puzzle than constructing a building...
It is important to remember that whether or not you use a pre-fabricated shed, you still have to build a sturdy foundation to hold your shed in place during high winds and storms. You must also get a permit to build the shed in most jurisdictions and pass building inspections along the way. There is no advantage either way.
Finally, when you build from scratch you have more flexibility as to where to place things like windows and doors. You also have more choices in exterior finishes like paint or stain on wood siding, shingles for the roof, and the quality of the materials you buy overall.
In truth, the final decision whether or not a pre-fabricated shed is a practical plan for building a shed as opposed to building that shed from scratch is totally dependent on how you choose to approach your project. I believe, however, that the decision may turn on how much pride you will have after the successful completion of a shed built from raw materials.
Don Koenig has been a professional carpenter and woodworker for over 25 years. He offers tips and ideas for building sheds an other woodworking projects at [http://www.designsforsheds.com]Designs for Sheds. Right now he is offering a free gift of a 24 page basic shed plan for a [http://www.designsforsheds.com/plans-for-shed-building/]12 x 8 Shed. Why not visit his site and see what all the fuss is about.
Article Source: [http://EzineArticles.com/?Is-Using-a-Shed-Kit-a-Good-Idea-As-One-Makes-Plans-for-Shed-Building?&id=6674100] Is Using a Shed Kit a Good Idea As One Makes Plans for Shed Building?
Read More..
We live in an increasingly complex world and often it seems that it is to our advantage to make things as simple as possible. So I begin with this basic question: When making plans for shed building in your backyard, is it best to use a pre-fabricated shed building or building the shed from scratch? Like everything else in life, the truthful answer is that it depends on your goals, confidence and experience.
Making Plans
I assume that because you are reading this you are planning to build a shed but you are still in the process of making your decision. Look, if you are an experienced carpenter or handyman you would have already made that decision, putting all of your experience to use. As a novice or a home hobbyist woodworker, you must decide several things before you begin your project. Building from a set of blueprints, providing they are the right kind of plans, offers far more flexibility in both design and space possibilities but is only slightly more complex to assemble. Of course, if you have the wrong plans then the project is doomed to being a full-blown disaster.
When I talk about the right plans I mean getting them from a source that offers a full line of designs and sizes to meet any space requirement. Those plans should also have a detailed, step-by-step set of instructions that assume that you know absolutely nothing about how to approach the task. Finally, your plans must have a full material list, down to the last nail and screw so there is no guesswork in purchasing materials needed. If you use a source like that then building from scratch is the way to go.
Advantages and Disadvantages
Of course, pre-fabricated storage sheds offer some options and have many potential advantages:
- There is a wide choice of materials available...
- Many pre-fab sheds are fully insulated and that provides an advantage if you plan on heating the shed...
- Interlocking pre-fab shed designs offer you the advantage of align and snap construction making the job more like solving a jig-saw puzzle than constructing a building...
It is important to remember that whether or not you use a pre-fabricated shed, you still have to build a sturdy foundation to hold your shed in place during high winds and storms. You must also get a permit to build the shed in most jurisdictions and pass building inspections along the way. There is no advantage either way.
Finally, when you build from scratch you have more flexibility as to where to place things like windows and doors. You also have more choices in exterior finishes like paint or stain on wood siding, shingles for the roof, and the quality of the materials you buy overall.
In truth, the final decision whether or not a pre-fabricated shed is a practical plan for building a shed as opposed to building that shed from scratch is totally dependent on how you choose to approach your project. I believe, however, that the decision may turn on how much pride you will have after the successful completion of a shed built from raw materials.
Don Koenig has been a professional carpenter and woodworker for over 25 years. He offers tips and ideas for building sheds an other woodworking projects at [http://www.designsforsheds.com]Designs for Sheds. Right now he is offering a free gift of a 24 page basic shed plan for a [http://www.designsforsheds.com/plans-for-shed-building/]12 x 8 Shed. Why not visit his site and see what all the fuss is about.
Article Source: [http://EzineArticles.com/?Is-Using-a-Shed-Kit-a-Good-Idea-As-One-Makes-Plans-for-Shed-Building?&id=6674100] Is Using a Shed Kit a Good Idea As One Makes Plans for Shed Building?
More work on the Media Cabinet
So for the last couple of days I have been working on milling more wood for the base. I really need to get the base right or the whole thing is going to be off. Also, as usual, Ive made a slight design change. In the stock picture, the base is flush with the rails and posts. I liked this, but it was going to be trickier than I wanted it to be. Also, Im using solid wood, not plywood, so this would be an issue with wood movement. So, Ive decided to change it to set on top, like a table top, with a 3/4-1" overlap on three sides (not the back). This solves my wood movement problem (sort of) but will also dress it up a bit; Im going to use a classic ogee profile on it. So, with that, Ive done all my mortise and tenon joints for the base rails.
Here it is all dry fit.
I have not glued it together yet as I want to add two cross braces about a third of the way in from each side. This will give me better support and also give me another place to screw the base into the bottom with slots for wood movement.
Next I milled up the 4/4 lumber that is going to be used for the base.
And here they are LOOSELY dry fit to the bottom.
I still need to cut them to exact length and glue them together. Im not in a huge hurry for that as I had to order the router bit I need for the profile so it wont be here for a while. But I think what I will start on next are the two main vertical support in the center of the cabinet, as well as the outside verticals. Im not completely sure how I want to attach these to the base, but I am leaning toward mortise and tenon here as well; input welcome on that one.
Well, back to the jointer and planer...
Be Safe!
Read More..
 |
| From MediaCabinet |
Here it is all dry fit.
 |
| From MediaCabinet |
I have not glued it together yet as I want to add two cross braces about a third of the way in from each side. This will give me better support and also give me another place to screw the base into the bottom with slots for wood movement.
Next I milled up the 4/4 lumber that is going to be used for the base.
 |
| From MediaCabinet |
And here they are LOOSELY dry fit to the bottom.
 |
| From MediaCabinet |
I still need to cut them to exact length and glue them together. Im not in a huge hurry for that as I had to order the router bit I need for the profile so it wont be here for a while. But I think what I will start on next are the two main vertical support in the center of the cabinet, as well as the outside verticals. Im not completely sure how I want to attach these to the base, but I am leaning toward mortise and tenon here as well; input welcome on that one.
Well, back to the jointer and planer...
Be Safe!
Tuesday, March 4, 2014
Router table fence
Ive been working on the top for my router table and once again, am going back and forth on the fence. I was originally going to add some t-slots in the top to adjust and lock down the fence. But then I saw one that employs a clamping system on the edges of the table.
I like that idea because I wont have to make those slots in the top of the table. They get filled with dust and sometimes its hard to slide the fence if it binds in one direction. So Im still playing around with a design.
 I got the hole cut in the top to hold the insert plate. Thats going to be really nice. Last week I mentioned that Kreg does not include the levelers with the plate. A little frustrating, considering they make no mention of that when you buy it. If they had a note on the package that said "levelers sold separately", that would be fine. Just let me know so I dont have to place a separate order!
 I got the levelers and guess what? Kreg didnt supply 1 1/2" coarse thread wood screws that the instructions clearly state are included with the levelers. No big deal, I needed shorter screws anyway. I really love Kreg tools, but they need to tighten up some of their procedures.
*****
Mere Minutes
Read More..
I like that idea because I wont have to make those slots in the top of the table. They get filled with dust and sometimes its hard to slide the fence if it binds in one direction. So Im still playing around with a design.
*****
Mere Minutes
Sharing projects
Just a few days before Christmas, but I wanted to share some really cool stuff people have been sharing with me.
*****
Most of us struggle to make ends meets. We deal with whatever life throws us. We try to earn livings and provide for our families.We are not woodworking gods, nor do we necessarily aspire to be. Yet, throughout it all we understand the value of diversion. Probably before an ancient man painted on a cave in Lasceaux, France, humans have been creative animals and need ways to express it. It doesnt take a lot of money or skill to make stuff out of wood, but the rewards are huge.
I have been living with cancer for a a year now. At this point I am pretty sure I have it conquered it and expect to live a long and healthy life. It could rear its ugly head again, but it certainly put life into perspective. I have no room in my life for anger, hatred, or bitterness. I just want to focus on making woodworking projects.
Simple woodworking projects can bring joy to a lot of people. Get yourself a cheap tablesaw, maybe a router and youre good to go!
*****
Steve Daughhetee has definitely been busy. He loves making scrap-wood projects, something I admire. Not only that, hes a poet. Check out his "Ode to the Bread Box Sisters". I really love it when people are able to combine creative pursuits. Woodworking doesnt need to exclude writing, poetry, music, etc.
Steve has been experiencing a certain amount of family struggle that I can relate to and has taken up my woodworking philosophy: "After all, its only wood."


Read More..
*****
Most of us struggle to make ends meets. We deal with whatever life throws us. We try to earn livings and provide for our families.We are not woodworking gods, nor do we necessarily aspire to be. Yet, throughout it all we understand the value of diversion. Probably before an ancient man painted on a cave in Lasceaux, France, humans have been creative animals and need ways to express it. It doesnt take a lot of money or skill to make stuff out of wood, but the rewards are huge.
I have been living with cancer for a a year now. At this point I am pretty sure I have it conquered it and expect to live a long and healthy life. It could rear its ugly head again, but it certainly put life into perspective. I have no room in my life for anger, hatred, or bitterness. I just want to focus on making woodworking projects.
Simple woodworking projects can bring joy to a lot of people. Get yourself a cheap tablesaw, maybe a router and youre good to go!
*****
Steve Daughhetee has definitely been busy. He loves making scrap-wood projects, something I admire. Not only that, hes a poet. Check out his "Ode to the Bread Box Sisters". I really love it when people are able to combine creative pursuits. Woodworking doesnt need to exclude writing, poetry, music, etc.
Steve has been experiencing a certain amount of family struggle that I can relate to and has taken up my woodworking philosophy: "After all, its only wood."
*****
Stephen Stange made his wife a drawer organizer. I have to say , this was one of the most useful projects ever. In a stump? Make kitchen projects!
*****
Now you gotta check out Mervs projects from South Penrith in New South Wales down under in Australia.
Merv had an accident a couple of years ago that rendered one of his arms useless. Did it prevent him from woodworking? Check out his fishing rod holder, outdoor seat and a spice rack. Love the details:
*****
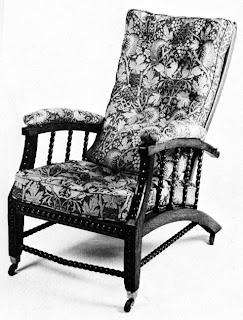
William Morris

The Arts and Crafts Movement was founded by William Morris. This movement was brought on by the dissatisfaction with the quality of work produced by the industrial revolution. Morris felt felt that mass-produced objects destroyed the relationship between designer and craftsman and he wanted reinstate the importance of handcrafted, functional, objects. As a designer he wanted to reinstate the connection between the craftsmen and designers. he felt that if he brought them together created a closer working relationship between the two the work would be of better quality. Morris, along with other leaders of the Arts and Crafts movement valued work that was true to the natural beauty of the materials, as well as simplified design aesthetics and the evidence of the craftsman’s hand. Craftsmen from this period were informed by the styling of the late Gothic and early renaissance, as many of them including Morris, studied under Gothic revivalists. Morris along with other followers of the movement incorporated natural forms into their designs.
Morris envisioned a socialist leaning doctrine wanting to create affordable and practical hand crafted objects for everyday use in the homes of the middle class. More importantly, Morris wanted to use smaller more personalized production to give workers enjoyable jobs where they could be take on creative and challenging projects with pride. Often graced with the prestigious title "Father of the lazy boy" Morris adjustable back chair was the first of its kind. Since Morris, the arts and crafts movement became very diverse, with a wide range of influences and stylistic elements; in fact, proponents of the movement would even discourage its categorization as a style
Subscribe to:
Posts (Atom)